Introduction
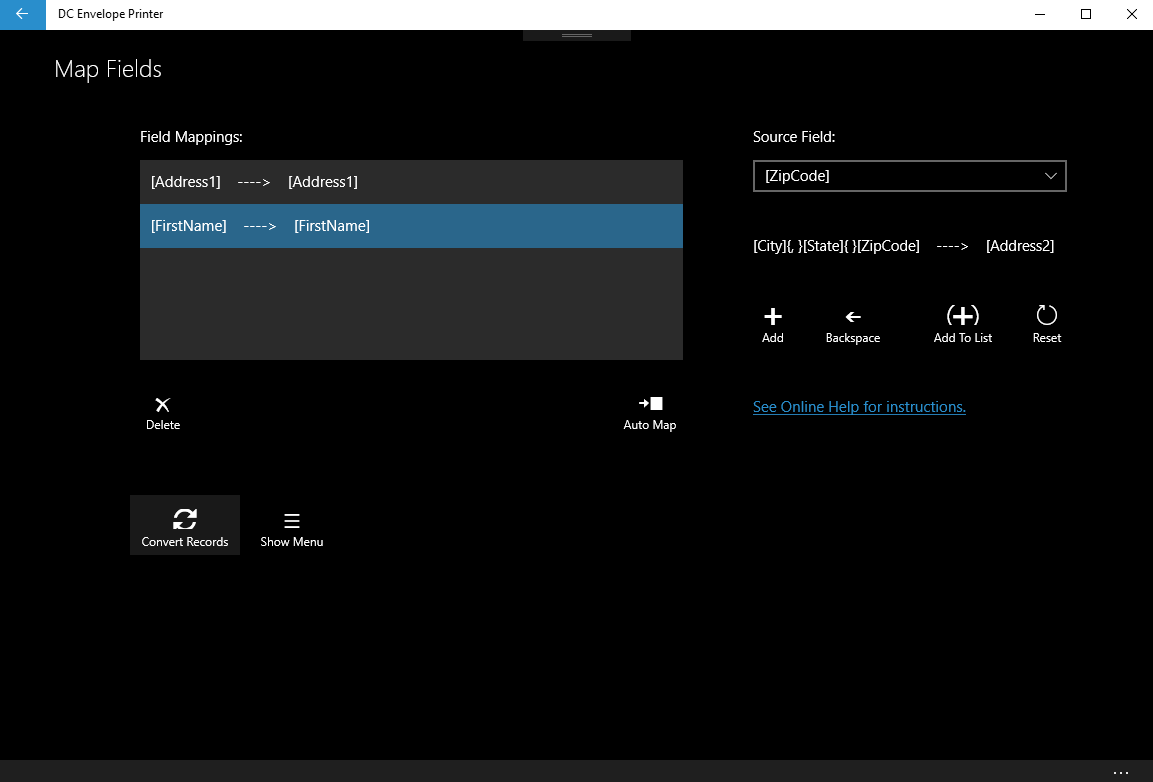
Often times when you open tab delimited text files with records, you will encounter a screen similar to the one shown here. When you encounter such a screen, you have to click on the Map Fields button, which takes you to the screen above. The above screen allows you to provide instructions to the DC Envelope Printer, regarding how it should move data between fields in the records it is importing, and fields in corresponding records created during data conversion, for the DC Envelope target table. For example, if you would like to instruct the DC Envelope Printer to copy data from the field Address1, in the records you are importing, to the field Address1, in the records the app creates for the Address table in the app, you would create the following field mapping:
[Address1] ----> [Address1]
You can manually create a field mapping such as the one shown above, using the field map editor, that is on the right in the above screenshot.
Field Map Editor
The field map editor allows you to manually create field mappings, which are instructions about how the DC Envelope Printer should copy data from an imported record, to a corresponding record the app creates for the target table (Return Address or Address) of the data importation. To create a new field mapping, click on the Reset button. This clears any field mapping which may have been displayed in the editor. Clicking on the Reset button should also cause the label "Target Field:" to be displayed above the combo box, at the top of the editor. Select a field from the target table (Return Address / Address) in the combo box, into which you would like data to be copied. Next, click on the Add button, to add the field to the mapping. After you do the above action, the editor will have the target field you selected to the right of the mapping arrow, with nothing to the left of the mapping arrow. Also, the label above the combo box at the top of the field map editor, should change to "Source Field:" as shown in the screenshot above. Next, select from the combo box, the field from the records you are importing, whose content you want copied into the target field. Then click on the Add button, to add this field to your field mapping. For example, if you wanted to copy data from the field Address2 in your imported records, to the field Address2 in records created for the Return Address / Address target table, you would click the Reset button, select "Address2" from the combo box, click the Add button, select "Address2" from the combo box, then click the Add button once more. After you have completed a field mapping, click on the Add To List button, to add your field mapping to the list of field mappings, in the list box on the left, which the DC Envelope uses to convert your records.
Beyond simple field mappings, you can create more involved field mappings, such as the one displayed in the map editor in the screenshot above. For example, the field mapping in the field map editor shown in the screenshot above, was created by clicking on the Reset button, selecting the target field Address3, clicking on the Add button, selecting the source field City, clicking on the add button, selecting the formatting field "COMMA + SPACE", clicking on the add button, selecting the field State, clicking on the add button, selecting the formatting field "SPACE", clicking on the add button, selecting the field ZipCode, then clicking on the Add button. Depending on the records you are importing, you may or may not be able to do the exact above field mapping exercise. Please note: if you added one or more source fields to a field mapping, you may delete them one at a time, using the Back button, in the field map editor.
Target Table Fields
The following are lists of field names in target Return Address / Address tables in the DC Envelope Printer, depending on its address field configuration:
Return Address Table Fields - Standard Field Configuration
IsForOrganization
AddressCode
OrganizationName
Prefix
FirstName
LastName
Address1
Address2
City
State
ZipCode
Address Table Fields - Standard Field Configuration
IsForOrganization
AddressCode
Tags
OrganizationName
Prefix
FirstName
LastName
Address1
Address2
City
State
ZipCode
Return Address Table Fields - Multiline Address Field Configuration
IsForOrganization
AddressCode
OrganizationName
Prefix
FirstName
LastName
Address1
Address2
Address3
Address4
Address5
Address6
Address7
Address8
Address9
Address Table Fields - Multiline Address Field Configuration
IsForOrganization
AddressCode
Tags
OrganizationName
Prefix
FirstName
LastName
Address1
Address2
Address3
Address4
Address5
Address6
Address7
Address8
Address9
Please note that the various address fields for the Return Address and Address target tables, when the DC Envelope Printer is configured to use a single multiline address field, are virtual fields. They are provided to make data importation and conversion relatively straightforward. For example, if you are using the DC Envelope Printer with a multiline address field configuration, and you would like to import data from a source table which has the following fields:
MyAddress1
MyAddress2
MyAddress3
MyCity
MyState
MyZipCode
You would specify the following field mappings, for the importation / conversion of your data:
[MyAddress1] ----> [Address1]
[MyAddress2] ----> [Address2]
[MyAddress3] ----> [Address3]
[MyCity]{, }[MyState]{ }[MyZipCode] ----> [Address4]
The DC Envelope Printer, would use your field mappings above, to map your various fields, to appropriate lines in the multiline address field, and then combine the contents smartly, to populate the single address field, in the DC Envelope Printer target table.
Auto Mapping Fields
The DC Envelope Printer has the ability to auto map field names from source records and the target table, that are identical. For example, if you had a field in your imported records with the name Address1, and you clicked on the Auto Map button below the list box in the above screenshot, a mapping between the Address1 field in your imported records, and the Address1 field in the DC Envelope Printer Return Address / Address target table, would be created and inserted into the Field Mappings list box. (Note: clicking the Auto Map button below the list box in the above screenshot, automatically clears away data which may be present, before new auto generated field mappings are inserted.) If you make the names of fields in the records you import, as identical as possible to the names of fields of the target table your are trying to import your data into, you could click on the Auto Map button, to have the DC Envelope Printer automatically do the mapping. If after you do the above, the mapping is incomplete, you could complete the mapping by using the Field Map editor.
Converting Your Imported Records
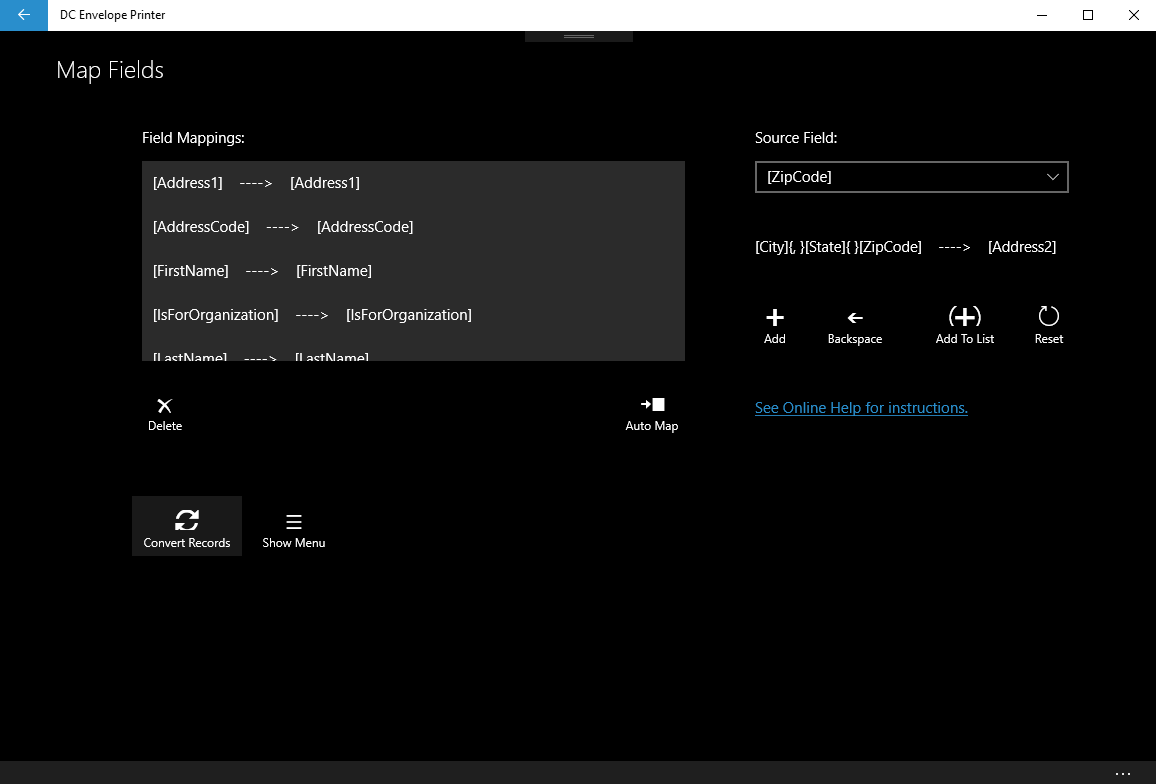
After you have completed your field mappings, the Field Mappings list box should have multiple field mappings, similar to what is shown in the following screenshot. Next, simply click on the Convert Records button, to have the DC Envelope Printer convert your records. (Please note: when you click on the Convert Records button, your converted records will be combined with a copy of live records in the DC Envelope Printer, and placed into a holding area, for your examination and processing.)
[Address1] ----> [Address1]
You can manually create a field mapping such as the one shown above, using the field map editor, that is on the right in the above screenshot.
Field Map Editor
The field map editor allows you to manually create field mappings, which are instructions about how the DC Envelope Printer should copy data from an imported record, to a corresponding record the app creates for the target table (Return Address or Address) of the data importation. To create a new field mapping, click on the Reset button. This clears any field mapping which may have been displayed in the editor. Clicking on the Reset button should also cause the label "Target Field:" to be displayed above the combo box, at the top of the editor. Select a field from the target table (Return Address / Address) in the combo box, into which you would like data to be copied. Next, click on the Add button, to add the field to the mapping. After you do the above action, the editor will have the target field you selected to the right of the mapping arrow, with nothing to the left of the mapping arrow. Also, the label above the combo box at the top of the field map editor, should change to "Source Field:" as shown in the screenshot above. Next, select from the combo box, the field from the records you are importing, whose content you want copied into the target field. Then click on the Add button, to add this field to your field mapping. For example, if you wanted to copy data from the field Address2 in your imported records, to the field Address2 in records created for the Return Address / Address target table, you would click the Reset button, select "Address2" from the combo box, click the Add button, select "Address2" from the combo box, then click the Add button once more. After you have completed a field mapping, click on the Add To List button, to add your field mapping to the list of field mappings, in the list box on the left, which the DC Envelope uses to convert your records.
Beyond simple field mappings, you can create more involved field mappings, such as the one displayed in the map editor in the screenshot above. For example, the field mapping in the field map editor shown in the screenshot above, was created by clicking on the Reset button, selecting the target field Address3, clicking on the Add button, selecting the source field City, clicking on the add button, selecting the formatting field "COMMA + SPACE", clicking on the add button, selecting the field State, clicking on the add button, selecting the formatting field "SPACE", clicking on the add button, selecting the field ZipCode, then clicking on the Add button. Depending on the records you are importing, you may or may not be able to do the exact above field mapping exercise. Please note: if you added one or more source fields to a field mapping, you may delete them one at a time, using the Back button, in the field map editor.
Target Table Fields
The following are lists of field names in target Return Address / Address tables in the DC Envelope Printer, depending on its address field configuration:
Return Address Table Fields - Standard Field Configuration
IsForOrganization
AddressCode
OrganizationName
Prefix
FirstName
LastName
Address1
Address2
City
State
ZipCode
Address Table Fields - Standard Field Configuration
IsForOrganization
AddressCode
Tags
OrganizationName
Prefix
FirstName
LastName
Address1
Address2
City
State
ZipCode
Return Address Table Fields - Multiline Address Field Configuration
IsForOrganization
AddressCode
OrganizationName
Prefix
FirstName
LastName
Address1
Address2
Address3
Address4
Address5
Address6
Address7
Address8
Address9
Address Table Fields - Multiline Address Field Configuration
IsForOrganization
AddressCode
Tags
OrganizationName
Prefix
FirstName
LastName
Address1
Address2
Address3
Address4
Address5
Address6
Address7
Address8
Address9
Please note that the various address fields for the Return Address and Address target tables, when the DC Envelope Printer is configured to use a single multiline address field, are virtual fields. They are provided to make data importation and conversion relatively straightforward. For example, if you are using the DC Envelope Printer with a multiline address field configuration, and you would like to import data from a source table which has the following fields:
MyAddress1
MyAddress2
MyAddress3
MyCity
MyState
MyZipCode
You would specify the following field mappings, for the importation / conversion of your data:
[MyAddress1] ----> [Address1]
[MyAddress2] ----> [Address2]
[MyAddress3] ----> [Address3]
[MyCity]{, }[MyState]{ }[MyZipCode] ----> [Address4]
The DC Envelope Printer, would use your field mappings above, to map your various fields, to appropriate lines in the multiline address field, and then combine the contents smartly, to populate the single address field, in the DC Envelope Printer target table.
Auto Mapping Fields
The DC Envelope Printer has the ability to auto map field names from source records and the target table, that are identical. For example, if you had a field in your imported records with the name Address1, and you clicked on the Auto Map button below the list box in the above screenshot, a mapping between the Address1 field in your imported records, and the Address1 field in the DC Envelope Printer Return Address / Address target table, would be created and inserted into the Field Mappings list box. (Note: clicking the Auto Map button below the list box in the above screenshot, automatically clears away data which may be present, before new auto generated field mappings are inserted.) If you make the names of fields in the records you import, as identical as possible to the names of fields of the target table your are trying to import your data into, you could click on the Auto Map button, to have the DC Envelope Printer automatically do the mapping. If after you do the above, the mapping is incomplete, you could complete the mapping by using the Field Map editor.
Converting Your Imported Records
After you have completed your field mappings, the Field Mappings list box should have multiple field mappings, similar to what is shown in the following screenshot. Next, simply click on the Convert Records button, to have the DC Envelope Printer convert your records. (Please note: when you click on the Convert Records button, your converted records will be combined with a copy of live records in the DC Envelope Printer, and placed into a holding area, for your examination and processing.)
Conversion Rules
In Return Address / Address records in the DC Envelope Printer, records that have their IsForOrganization field set to true, also have their OganizationName field populated with names of the organizations the records are for. Return Address / Address records that have their IsForOrganization field set to false, also have their Prefix, FirstName, and / or LastName fields field populated with names of the individuals the records are for. (Note: at a minimum, Return Address / Address records for individuals, have at least their FirstName or LastName field populated.) When you organize your records to be imported into the DC Envelope Printer, try at a minimum to arrange your data so that you can map fields in your records, to the IsForOrganization, OganizationName, Prefix, FirstName, and LastName fields in the DC Envelope Printer target tables, so that Return Address / Address records are created and populated consistent with the way the DC Envelope Printer does the same.
If you find it difficult to, or would rather not do the above, please note that the DC Envelope Printer will convert your records consistent with the following rules:
a) If your field mappings include a field mapping to the IsForOrganization field in a DC Envelope Printer target table, and the field is set to true in a tentative record, any value which may wind up in the Prefix, FirstName, and / or LastName fields, will be combined and placed in the first line of the multiline address field, if your app is configured to use such an address field. If your app is not configured to use such an address field, the data will be discarded.
b) If your field mappings include a field mapping to the IsForOrganization field in a DC Envelope Printer target table, and the field is set to false in a tentative record, any value which may wind up in the OganizationName field, will be placed in the first line of the multiline address field, if your app is configured to use such an address field. If your app is not configured to use such an address field, the data will be discarded.
c) If your field mappings do not include a field mapping to the IsForOrganization field in a DC Envelope Printer target table:
i) If after preliminary data conversion, data is found in the Prefix, FirstName, and / or LastName fields in converted records, but not in the OganizationName field, the IsForOrganization field will be set to false.
ii) If after preliminary data conversion, data is found in the OganizationName field in converted records, but not in the Prefix, FirstName, and / or LastName fields, the IsForOrganization field will be set to true.
iii) If after preliminary data conversion, data is found in both the OganizationName field, and a combination of the Prefix, FirstName, and / or LastName fields in converted records, the IsForOrganization field will be set to false, and data in the OganizationName field will be placed in the first line of the multiline address field, if your app is configured to use such an address field. If your app is not configured to use such an address field, the data in the field will be discarded.
Next >>
<< Previous
<< Topic Home Page
<< Tutorial Home Page