
Introduction
After address records, which optionally include tags, have been entered into the DC Envelope Printer's database; a mailing list has been created or retrieved; and you applied configuration settings (which included the mailing list you created / retrieved) to your envelopes for printing, you can further configure your envelopes in the bulk mail main page of the DC Envelope Printer, before printing them.
Basic Interaction With Your Envelopes
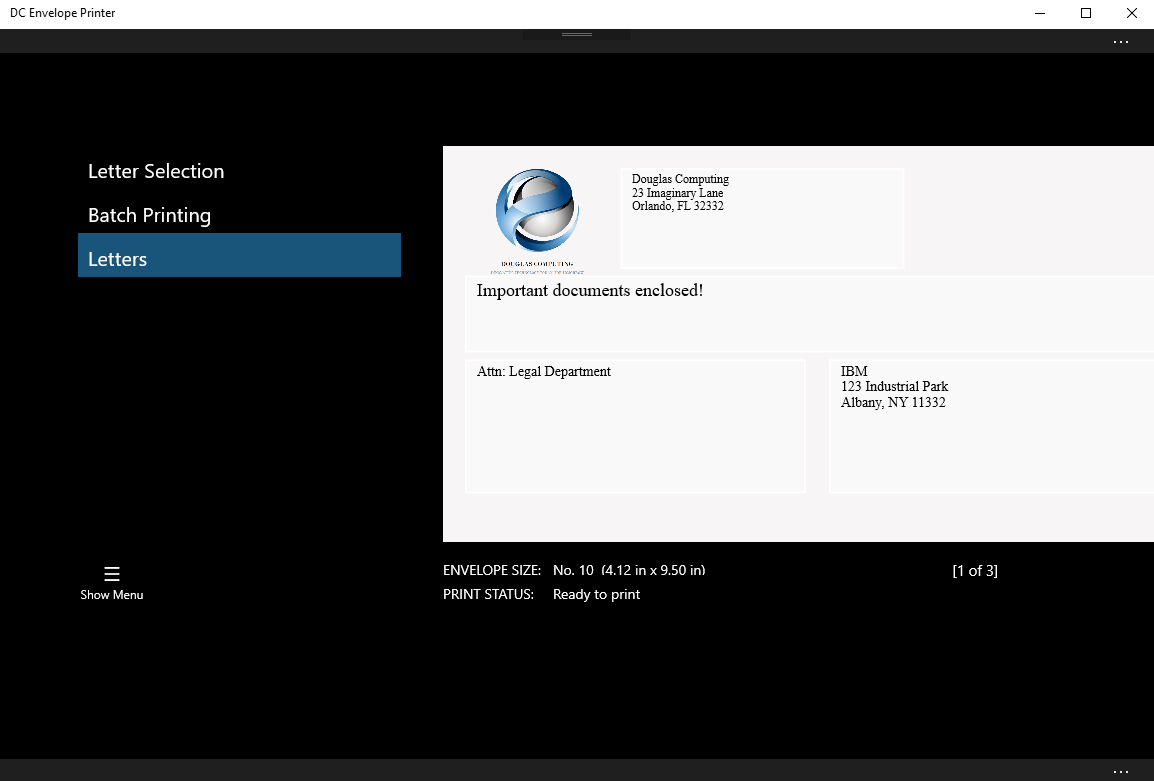
After the above steps have been completed, there should be envelope records present on the bulk mail main page. When you click on the "Letter Selection" button on the left of the page, you should see a list box containing the Full Sort Name values of the addresses that make up the mailing list, that was applied to your envelopes. If you click on the "Letters" button on the left of your screen, you should see your envelopes. You can scroll through your envelopes using the back and forward buttons below the stack of envelopes. You can also scroll through your envelopes by swiping them back and forth with your fingers, if you are on a touch screen device. You can directly modify the return address and address in any envelope if you wish. If you have horizontal and / or left note enabled, you can also directly modify the values of notes on each envelope if you wish.
The Full Sort Name list and the envelope stack are interactive. If you click on a value in the list box with the Full Sort Names, this will display the corresponding envelope. Also as your move through the stack of envelopes with the back and forward buttons, the corresponding Full Sort Name values for the envelopes become selected.
After address records, which optionally include tags, have been entered into the DC Envelope Printer's database; a mailing list has been created or retrieved; and you applied configuration settings (which included the mailing list you created / retrieved) to your envelopes for printing, you can further configure your envelopes in the bulk mail main page of the DC Envelope Printer, before printing them.
Basic Interaction With Your Envelopes
After the above steps have been completed, there should be envelope records present on the bulk mail main page. When you click on the "Letter Selection" button on the left of the page, you should see a list box containing the Full Sort Name values of the addresses that make up the mailing list, that was applied to your envelopes. If you click on the "Letters" button on the left of your screen, you should see your envelopes. You can scroll through your envelopes using the back and forward buttons below the stack of envelopes. You can also scroll through your envelopes by swiping them back and forth with your fingers, if you are on a touch screen device. You can directly modify the return address and address in any envelope if you wish. If you have horizontal and / or left note enabled, you can also directly modify the values of notes on each envelope if you wish.
The Full Sort Name list and the envelope stack are interactive. If you click on a value in the list box with the Full Sort Names, this will display the corresponding envelope. Also as your move through the stack of envelopes with the back and forward buttons, the corresponding Full Sort Name values for the envelopes become selected.
Batch Printing
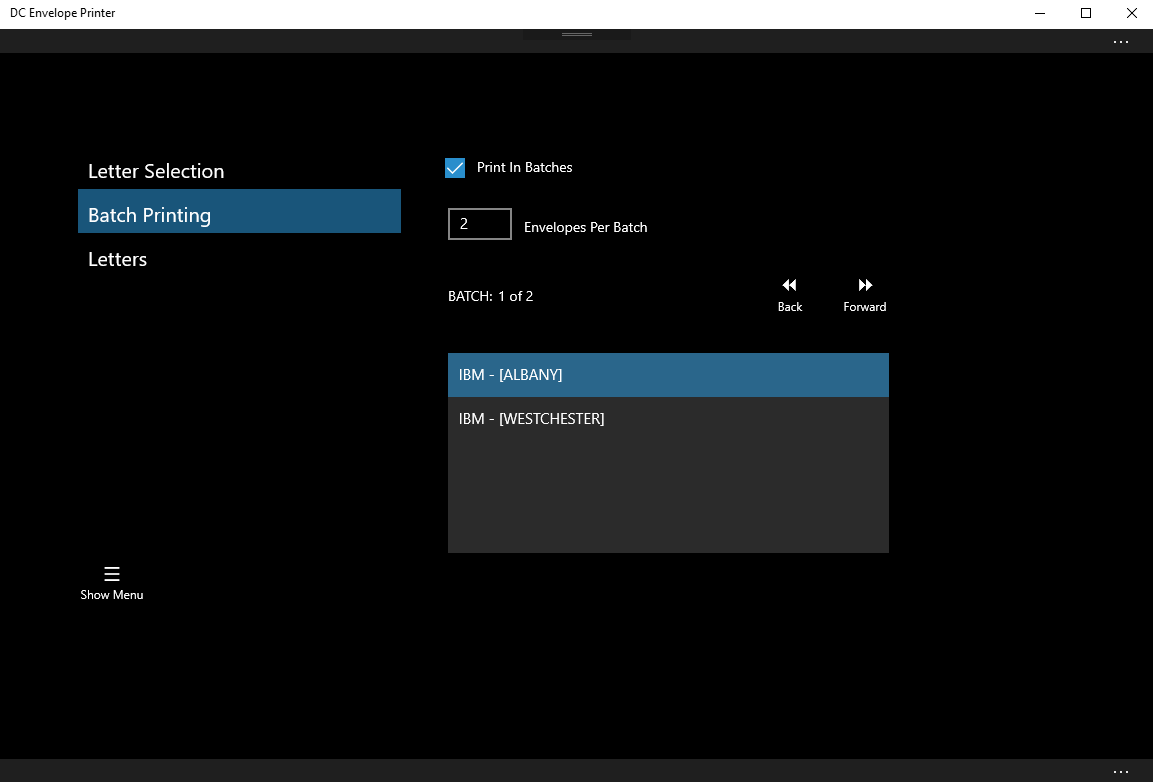
Many printers can only print a limited amount of envelopes at once. The DC Envelope Printer allows you to automatically divide the envelopes you have scheduled for printing, into batches. To use the batch printing feature, click on the "Batch Printing" button on the left of the bulk mail main page, and check the "Print in Batches" check box. Next enter the number of envelopes you would like printed per batch. If your printer can hold / print for example, a maximum of 20 envelopes at once, enter 20 into the "Envelopes Per Batch" text box. Now when you print your envelopes, the current / displayed batch of envelopes will be printed. When you want the next batch of envelopes to be printed, click on the "Forward" button in the Batch Printing section of the bulk mail main page, to advance to the next batch, then go through the regular procedure to print your envelopes once again.
Managing Notes
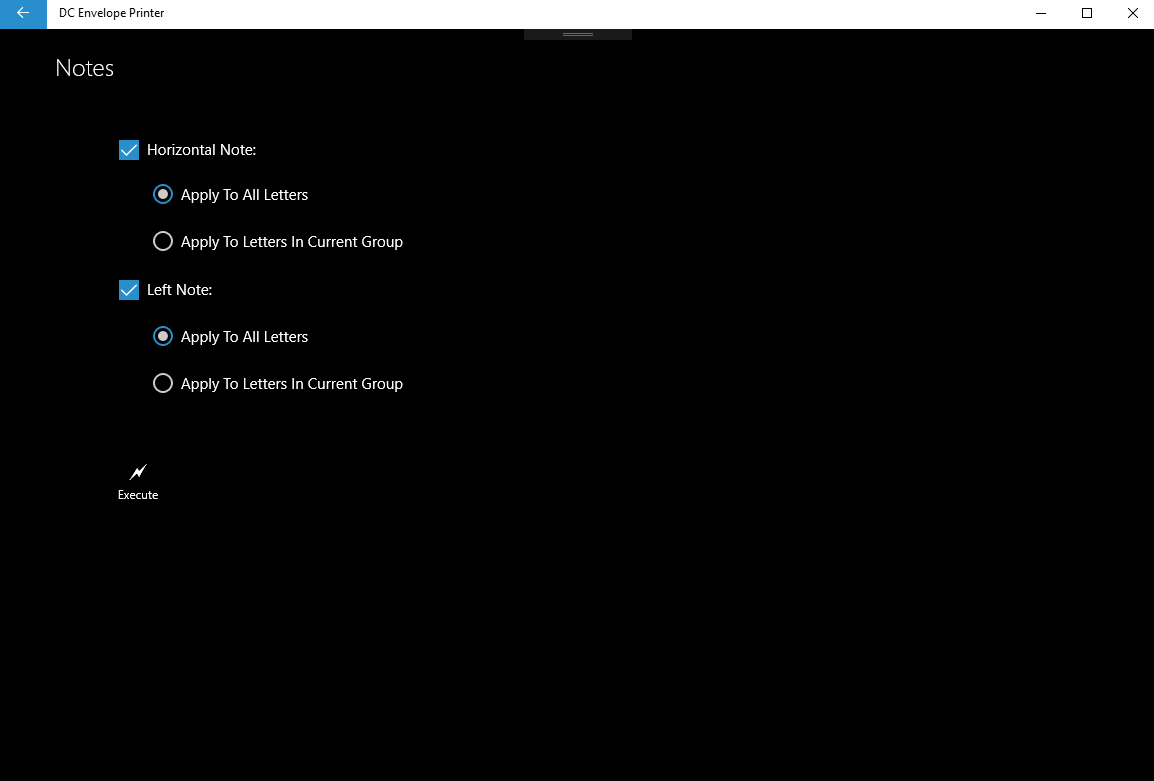
If you have horizontal and / or left note enabled, and you would like your notes in one envelope, copied to all your envelopes, or just your current group of envelopes, first click on the "Letters" button on the left of the bulk mail main page, then enter into the displayed envelope, the notes you would like propagated into the horizontal / left fields, of other envelopes. Next, click on the Notes button on the bottom menu bar for the page. This brings up the Notes page shown in the following screenshot. The Notes page enables options, based on which ones are available to you. For example, if you enabled the displaying of horizontal notes on your envelopes, but not left notes, you will only be able to interact with the controls for horizontal notes. Check the "Horizontal Note" and / or "Left Note" check boxes, if you would like the values for these notes in the current envelope, to be propagated. Next, select the "Apply To All Letters" radio button, if you would like the current notes to be applied to all envelopes. If you are using batch printing for example, and you would like the notes to be copied to only the current group of envelopes, select this radio button instead. Once you have finished making your selections, click on the Execute button, to undertake your action.
Grouping Envelopes
Besides the automatic grouping done in batch printing, you can group your envelopes further for printing. To do so, click on the "Letter Selection" button, to the left of the bulk mail main page. Next, in the list box for the section of the page, select the Full Sort Name for the first envelope in the group of envelopes you would like printed, then click on the "First Letter" button below the list box, to mark the first letter in your group. Next, in the list box, select the Full Sort Name for the last envelope in the group of envelopes you would like printed, then click on the "Last Letter" button below the list box, to mark the last letter in your group of envelopes, which should be printed. Now when you print your envelopes, only the ones that fall into the group you just defined, will be printed. This feature allows you to do free form groupings of your envelopes for printing. You can even do batch printing within a group of letters you defined with the above feature.
If you would like to reset the current group of letters that are to be printed, back to their default settings to include all letters, click on the Reset button, on the bottom menu bar - while you are in the "Letters Selection" section of the bulk mail main page.
Automatic Saving of Data
Generally when you navigate away from one page to another in the DC Envelope Printer app, the data on the old page is automatically saved. The same is true for envelope and other settings data in the bulk mail main page. Therefore if you would like to ensure that your data in the bulk mail main page is automatically saved, go to another page such as the "Update Database" page, and use the back arrow at the top left of the new page, to return to the bulk mail main page.
Old Data
Please note that the data saved in the bulk mail main page is a snapshot of the address record data in the DC Envelope Printer's database. This means that if after you have applied a mailing list and other configuration data to the bulk mail main page, you modify address records that are part of the mailing list and other data, the changes will not be seen in the data on the bulk mail main page. If you would like the bulk mail main page to have the latest version of your data, you will have to click on the Configure button on the bottom menu bar for the page, then reapply the Configuration Envelopes page settings, to the bulk mail main page (by clicking on the Apply button on the left of the Configuration Envelopes page).
<< Tutorial Home Page
<< Bulk Mail Section Home Page